Monday, June 17, 2013

Cocktails & Dreams

Hope everyone enjoyed Father's Day weekend! We took Sara's Dad to Granite City for brunch on Sunday morning...if you haven't been to their brunch before, you need to go...it's excellent. Wish we could have also shared the day with Brian's Dad, but we will have to postpone our celebration until July. We are both so fortunate to have amazing Dad's in our lives that have always been there for us and who continue to teach us about life and love each day. Plus, they are the ones that introduced us to home improvement and diy, so we wouldn't be anywhere today without them. Love you both!

This week was pretty busy for both of us, but we still got a lot done on our kitchen/main room remodel. It's starting to come together and we will be sharing those details later this week.

One of our favorite projects that we started this week is our bar area. Remember when it looked like this?

Our bar nook
Yeah, we weren't sure those bowed faux-wood shelves were going to hold up much longer, so they were the first to go. Oh, and don't forget about that hot neon-blue shag...

Don't worry...that's staying :) We need a little character in there :)

We had thought about replacing the faux-wood shelving with glass shelves, but we weren't sold on the idea yet so we left the space alone while we continued to demo, drywall and paint. Then on a whim, we stopped by the Habit for Humanity ReStore and found what we didn't even know what we were looking for...

This was too good to pass up

Now, of course we measured the space before we went to the store...I mean it was a couple days prior and we didn't write any of the measurements down, but Brian convinced me that it would work. And he was spot on...check out this handsome handyman gloating over his brilliant mind:

Couldn't have cut it better than this

So the first thing that we did was con Sara's dad and brother to come over to screw it into the wall. Thanks to Tequila and Callie, it took twice as long to put up because they were running around like idiots knocking everything over (surprise, surprise). But we got it hung...

Good news...it didn't fall!
Once it was leveled and hung, we stood back and noticed how uneven our ceiling looked. It almost made the entire cabinet look like it was tilting, but Brian was convinced he could fix that. Either way, it is a major improvement from the bowed shelving!

So, being the patient wife, I waited an entire hour before I got right to work priming the cabinet. Not satisfied settling with just painting the back of the cabinet to match (and ok, I ran out of primer), I decided to look for alternatives ways to update the cabinet. And I did the one thing I swore I would never do...I decided to put up wallpaper. After some research and sticker shock with some of the prices I saw online for wallpaper, we decided to hit up Lowe's and found a pattern that we really liked. It was about $21 a roll, so it wasn't too much to spend in case it turned out to be a disaster. There weren't too many left at the store and when I reached in to pick up a roll, there was one inside that had been opened already...we took it to the front and they let us walk out with the opened roll for $8.50! Score! Especially since Brian wasn't sold on the wallpaper idea...he remembers very clearly his dad putting up wallpaper in his little sister's room when they were growing up and remembered vowing to never attempt it due to all the mess.

But I am so happy that we decided to try it! All we had to do was add some water...after a few trial & errors, we got it up and I am so impressed with Brian's measuring, cutting and alignment skills.

The color changes with the light and it has just enough sheen to make it interesting...not a bad $8.50 investment!
Then, since we have already sharpened our carpentry skills with the bar stools and console table we decided to build a custom wine rack to fit below the cabinet. This replaces the one we had in mind to go in between the studs of our kitchen and mainroom but didn't have enough space for. Sometimes compromise works out in our favor...

Fully stocked and ready to go

We also painted the back piece of drywall black to add a little contrast with the wine rack and as a background for the some of our finishing pieces (that will come later). Then, to finish the piece we added some trim and pieced in some scrap wood to add a base at the top corner of the cabinet to help lay in some caulk.

I love trim!
After lots of caulk, 2 coats of primer and Impervo, here is the end result:

After the last coat of paint - and my husband did an amazing job caulking the top to fill in the gaps!
What do you think? Not too shabby :). And the best part, we spent less that $60 on everything including the cabinet piece, wallpaper and the wood to make the custom wine rack! It was a lot of work, but I think it is one of my favorite areas of the house now. We also cut windows in the doors and will add those and the shelves once the paint cures, so we will add more pictures once we get those up. Granite will come next and then we will be able to finish it up with a backsplash, so stay tuned to see the final after. For now, we are enjoying our progress:

A little work goes a long way

We'll have more updates this week on our progress, but for now we will leave you with an Awkward Schorr Family photo...

Tequila doesn't really enjoy these moments as much as we do :)
Hope you enjoy the rest of your Monday!

XOXO,

Sara, Brian & Tequila

Sunday, June 9, 2013

More painting and building furniture

Hope everyone has been enjoying this beautiful weekend! We have gotten quite a bit more done this week and both rooms are starting to come together. The week started off by finishing the drywall so we could start to clean up the layers of dust that settled all over the house. We definitely could not have even made a dent in the dust without the help of Sara's mom Darcie, who came over with Callie to dust one room at a time. We were able to move everything from the kitchen and dining room to our second pantry (aka the guest room) to keep it out of the way. Callie is not a very helpful duster and likes to bite at both the duster and the person dusting, so we had to find creative ways to keep her occupied...Tequila moped in the corner most of the time, so he didn't help much.

While Sara's mom tackled the dust, Sara started painting the vaulted ceilings in the main room and by the time Brian got home from work, we were ready for the second coat and the primer on the walls.

Look at how tall the room looks now!

Starting to come together
The ceiling came out way better in the main room than the kitchen...mostly because Brian did such a great job sanding and we are so glad we scraped the popcorn ceiling. Once the primer settled, we started to add color to the room. We had looked at several paint colors over the last couple of months, and the one color that we kept coming back to was Benjamin Moore's Palladium Blue. The color is supposed to be a blue/gray/green color, but it looks a lot more like a sea green and we love it. It also changes with the light which is perfect with the skylight that we refinished.


View with the skylight and fireplace

A look into the kitchen...oh yeah, we also painted the top beam black to freshen it up a bit. Oh yeah, did I mention we are building a kitchen island? :) More to come on that later!

Now that most of the color is up we found some areas that need to be refinished, so we will be working on that in the next few weeks, but overall the paint has really transformed the space. Plus we started getting in some of the pieces we ordered including the kitchen sink, the new faucet, slip covers for the couches (so impressed by them), the new chandelier and the new hardware for all the drawers and cabinets. It's been like Christmas at our house and we (ok, mostly Sara) have had to restrain ourselves from opening all the boxes and getting everything out. We will be sharing pictures of everything once they are in place, so for now you'll have to wait.

The best part of this week was that Brian decided to use some of his PTO time to extend his weekend from Friday to Monday, so naturally Sara came up with fun new projects to start on. We had been having some trouble finding stools for the kitchen island we are building (more to come on that soon) and an accent table to go behind the couch. Everything that we liked was way too expensive and we would rather put our money into the flooring and counter tops, so we had to start getting creative. Sara is addicted to Pinterest, and stumbled upon the website http://ana-white.com/ which has plans for all sorts of building projects (she is amazing!). After some searching, we found plans for an accent table and bar stools that we wanted to try to build ourselves. All of her plans come with shopping lists, cut lists, building plans with diagrams and pictures along with a rough estimate of the cost of each project so we knew what we would be getting into before we started. Here are the pictures along with the links to the plans for each project:

Rustic X Console Table - We followed the plans for this table that will sit behind our sofa in the main room. We've never really built furniture before, but this wasn't too difficult to make and I love how it looks. Plus it's super heavy and sturdy, so it will be perfect to store items and decor for the main room.
Before the stain

With stain
We started with Minwax water based stain in Slate, and since it was a little too gray, we sanded the piece down a little, did a coat with a light white wash and played with the color a bit.We may do some more adjustments to the color, but it does look nice with the color in the main room.

Cheshire Vanity Stool - We really liked the look of this stool with the nail heads, and we customized the stools to bar stool height by extending the length of the 2x2s to 27.5". We also bound the legs together before we started to put the stools together and sanded down the ends to make sure that they sat flush and wouldn't wobble...I would definitely recommend doing that because they are sturdy and don't wobble at all.

We built the frames first...we don't have a kreg jig (yet) so we screwed everything in from the sides

2 coats of black paint...we started painting the stools a different color, but ended up choosing a black enamel that turned out much better
 Make sure to paint the stools and let them dry overnight before you add on the cushions and the cover...it makes everything go on much smoother. We found a faux white leather at JoAnn's Fabric on sale for $8/yd and decided to trim them with nail heads. Note for the JoAnn newbies (like us), check the size of the nail heads before you dump them all into your basket, even if they come in the same row...we didn't realize that we grabbed 2 different sizes until we were hammering them in...luckily, we were able to cover the one stool with the larger nail heads, and had enough of the smaller ones for the last two. Our thumbs are really sore from tacking them in...and yes, the nail heads aren't perfectly straight...we eyeballed it while we took some time out from the sun and watched HGTV for inspiration, but I'm still pretty impressed :)
Final version...a lot better than spending $100 per stool!
While we were outside painting and building, we decided to spray all of the hinges for our cabinets and the ugly brass fireplace.
Fireplace - satin nickel spray paint

Lots of cabinet screws - best tip, put them all on a Styrofoam block and spray them...then keep them here until it's time to attach the cabinets (genius!)

It's a whole lot cheaper to spray paint the hinges than to replace them...
Oh, and on top of all the painting and building, Sara found a no-sew way to make pillow covers. So she made a 2nd trip up to JoAnn's to pick out fabric for pillows and Unique stitch, which is the best invention ever for people that do not sew and do not have the patience to learn how. Check out these babies...

Not too shabby...and yes, they are sitting on top of the couch with the new slip cover...yeah, we couldn't wait :)

It was way cheaper to cover the pillows than it was to find new pillows that didn't break the bank...I liked doing it so much, I may be making covers for all the pillows in our house, and my mom's. Plus, you don't have to be too exact and if you mess up, you can easily rip them apart and start again (I know from experience). Just make sure to let everything dry overnight, then cover your pillows!

We are going to take the rest of the night off so that we can work on plans for the bar area tomorrow. We'll have more updates and pictures soon! For now, I'll leave you with a couple pics of our little man...

Helping me write this blog

Building furniture is hard work

Always supervising

Hope you have a wonderful week!

XOXO,

Sara, Brian & Tequila

Monday, June 3, 2013

Kitchen Remodel Update - Top 10 Tips for Painting Cabinetry

 Hope everyone had a wonderful week! We had a really busy one at the house, full of drywall and paining. Due to the crazy storms we had this week, the drywall mud took a bit longer to dry because of the humidity and the last coat of mud is almost dry and ready to be sanded down. While the mud was drying, we sanded down the remaining popcorn on the ceilings to make a nice smooth surface for painting. This is a super messy project that only gets messier when you don't put tarps up around the door coverings before you start to sand or remove everything from cabinet shells in the kitchen...whoops! So now our entire house has a lovely layer of dust that covers every surface. Fortunately, Brian put up tarps before we sanded the vaulted ceilings, but the damage had already been done. We didn't take any pictures of the mess because we would rather not dwell on Sara's shortcomings. Needless to say, we have been cleaning and wiping off everything from the kitchen and moving it to our front room that was one of the only rooms in the house without an inch of dust hanging around. We will be doing a mass dusting/cleaning of the house once we sand the last bit of drywall tonight and will be using an air compressor to clear more dust from the ceiling and in all of the cabinets so we can start to breathe a little easier while we are working. (Note - This is not ideal project for someone that has just started getting over pneumonia they had for 2 months, but I like to test my limits sometimes, and I am paying for it a bit). 

Once we get all of the dust cleared we can start priming and painting the ceiling and walls and the room will (hopefully) start coming together. That brings me to the biggest project we worked on this weekend...panting the cabinets...here are a few pictures of our progress including a reminder of what we started with:

Before - Dark wood, but decent quality cabinets

After - White and clean looking

More cabinets in a messy garage

Our creative space-saving drawer painting area
You can't really see how great the paint settled in through pictures, but trust me, the Satin Impervo paint we used settled in nicely and in a few more days you won't be able to scratch them with a nail. Since I have gotten several emails about what paint/tools we've used, I thought I would share some tips and tricks that we learned along with the products that we used to help anyone looking to update their kitchen/bathroom cabinets.

Top 10 Tips & Tricks for Painting Cabinetry
 
1. Do your research. Before you start any projects, I highly recommend doing lots of research on painting cabinetry because everyone does it a little bit differently, and you need to do what you feel comfortable with. Definitely look online through multiple home improvement websites and diy blogs, by asking a professional contractor (thanks again Lori Howarter!), painter and the older guys working in the paint department at your local hardware/paint store. (I like to ask older guys because I think they've experienced more, but usually anyone in the department knows their stuff...though I would make an exception if I saw anyone resembling Anthony Carrino and John Colaneri from HGTV's Cousins on Call because A- They are awesome at everything and B - They are ridiculously good looking...I'm obsessed with their shows and Brian already said that he would be more than happy if they decided to swoop in and take over our remodel at anytime).

--Oops, I got a little carried away there, back to the list...

2. Buy the expensive paint. You are going to be looking at your cabinets everyday...go all in for the good stuff. We opted for Benjamin Moore Satin Impervo paint, and yes I think my husband may have choked on his gum and almost fainted from sticker shock when we went to ring up our purchase (he can be super dramatic at times), but the guy behind the counter (yes, he was older) reinforced my decision by saying that there is a reason why the paint is expensive...it's the best and it's what the professionals use. We had to go to a specialty paint store to find the Impervo, so check your local store before you go. 

3. Always do TWO coats of primer. Trust me, even if you think one coat will do, use two. Primer dries super fast and you can do two coats really quickly. I admit, there are a few places I only did one coat of primer and now I am regretting it. With two coats of primer, you can get away with only one coat of Impervo, especially in places that won't be seen as much...and this is especially good so that you "don't have to take out a second mortgage on your house to buy another gallon [of Impervo]" - quoting my wonderful, yet over-dramatic husband. (A gallon of Impervo is about $90, so it's a little pricy, but so worth it). Also, make sure to use an oil-based primer if you are using oil based paint and if you can paint outside, do so, or create lots of ventilation in your space...the primer is stronger than the Impervo. Reminder - please make sure your pets stay outside and away while you paint and several hours while it dries...they are more sensitive to chemicals and smells than you are and you do not want them to have breathing problems! 

Left side - Two coats of primer, Right side - just one. It makes a huge difference in the end
4. Use good brushes and rollers. Make sure to use a roller specifically made for oil based paints if you are using the Impervo paint so it glides on smoothly. Invest in a few finishing brushes that are angled for trim and to get into the corners of the cabinetry...you can't go wrong with Purdy brushes and BM makes some nice ones too...cheap brushes are ok for priming, but just like the paint, don't get cheap with the brushes...they are expensive because they work the best and you don't have as many brush marks as you would with cheaper versions. 

5. Don't skip the sanding. If you are going to take the time to paint your cabinets, make sure to take the time to sand them. It helps even out the surfaces and removes any gloss, residual paint and anything else that has caked on your cabinets over the years. You don't have to sand them all down to the original wood, but scuff them up plenty so that the primer can soak in and make the paint go on smoother and more appealing as it dries. For the cabinet's shell (that's what I call the area left after taking off the doors and drawers), you can clean everything with a TSP solution and then use a liquid sander deglosser so you don't have a dusty mess all over the kitchen - of course I could have sanded the cabinets shells when I sanded the ceiling, but that would have been too easy :). We also used the liquid sander deglosser before priming, just to cover all my bases...make sure to use gloves when handling this stuff because it is nasty and can rough up your hands a lot. You will also want to lightly sand down drips and rough areas in between each layer you paint, to finish with a smooth surface. Just use a medium to fine-grit sanding sponge and wipe away the debris before the next coat of paint. 

6. Start painting the backs first. You will want the final coat of paint to go on the front side of the cabinets, so plan accordingly.

7. Be patient. This is one of the most challenging parts for me because I would have liked for the remodel to have been over in a weekend and I have the patience of my mother (zero). This is extremely important if you are using the BM Satin Impervo paint because although it will be dry to the quick touch in 4 hours, it needs at least 12-24 hours to settle between coats. So start early and then sit back and relax, or make your husband start on another project while you wait (crackin' the whip). And to test your patience even more, you really need to wait 7 to 10 days before you attach the doors and add on the hardware. This paint likes to take its time to settle and harden into the intended finish. We are on day 2 after the last coat and I already want to move everything back into the kitchen, but I will wait. After putting all of this time and energy into this project, a couple more days won't matter in the long run...plus I purposely waited to order the hardware until the last day of painting so I have no choice but to wait until they get here to attach the pulls :)

8. Have everything prepped and ready to paint before you start. It's easier to clean, sand and paint everything at once, so take the time beforehand to make sure that you have all of the supplies that you need and all the hardware off before you start. Here's a pic of most of the supplies that we used:

Some standard supplies and some not-so-standard

9. Use paint thinner. When you are using oil based or acrylic paints, soap and water will not clean your brushes off at all. Know the saying oil and water don't mix? That's because they don't so if you try to just rinse off your brushes, you're wasting your time. Also, don't try to dilute the paint thinner with water...it doesn't work and if you leave your brushes sitting in the mixture for a couple days because you forgot about them, they will be ruined. Use straight paint thinner in a bucket (or a milk jug cut in half) and set your brushes in the thinner for at least an hour, then take the brushes out back and rinse with your garden sprayer in an area that you don't mind getting paint all over. I also dip my fingers (and most of my hand) into the thinner to loosen the paint that I have splattered all over myself and rub the paint until it's a milky color and use soap and water to clean. I'm not sure if it's that great for your hands, but it's the only way to get the paint off. 

10. Have Fun! Painting cabinetry can really suck the life out of you, but for me it is totally worth it. I hit shuffle on my iPod, hook Tequila up on a long chain in the front yard and start rocking out with my brush. My music taste is a bit eclectic and I tend to get lost in the music so the people driving down our street and exercising on our trail have probably had a few laughs at my expense while I am rapping & shaking it to some old school Salt-N-Peppa and Trina (Steph - you know what's up), rocking out to some Wolfmother and bustin' out some smooth moves to MJ, but it does make the work a lot more fun!

My painting crew
    Hope these tips helped, and please feel free to let me know if you have any questions on any of the products that we used. We'll have more updates and projects soon, but until then, here are a few teasers of things to come...

We're making window cabinets! (Check out those handsome fellas)

Callie stopped by to help remodel the pantry (and find old dog bones and crumbs to chew on)
Enjoy the rest of this beautiful Monday!

XOXO,

Sara, Brian and Tequila

Monday, May 27, 2013

Happy Memorial Day!

We hope everyone has enjoyed this Memorial Day Weekend! We have been quite busy over the last week and have decided to take the evening off to finally relax for a bit. The kitchen and the main room are finally starting to come together and we are past a lot of the demo phase.

Remember the wood paneling behind the drywall in the main room? We had to cut it out around the entire main room, which sounds a lot easier than it actually was. We also decided to cut out parts of the ceiling around the fireplace because the drywall had some water damage from before we bought the house. Luckily it was minor damage and we were able to borrow Sara's dad's truck for the week so that we could take a few loads over to the dump. We also painted all of the trim and the kitchen cabinet frames white using Benjamin Moore's Satin Impervo Paint. Note to anyone that uses oil based paint for the first time, make sure that you have plenty of air flow throughout the house and open up all the windows. Also, keep your pets at a friend's or relative's house because as the fumes are really strong for humans, they are three times worse for animals. Tequila wasn't in the house much, but he still had some trouble when he came in to check on the progress so he got to have a sleepover with Uncle Mat while the fumes died down overnight. Here are a few pics from our progress...

The bar...we took off the counter top and painted the frame

Check out the remaining blue shag carpet that used to flow throughout the house (hot)

This is the area that had some water damage from before, but we sealed up everything, cleaned it and repaired any damages

Had to take it down to the studs here to remove the old porch fan and to even out the wall going into the kitchen

We used a drywall patch to cover the hole in the sun room so we will finally have a complete wall :)
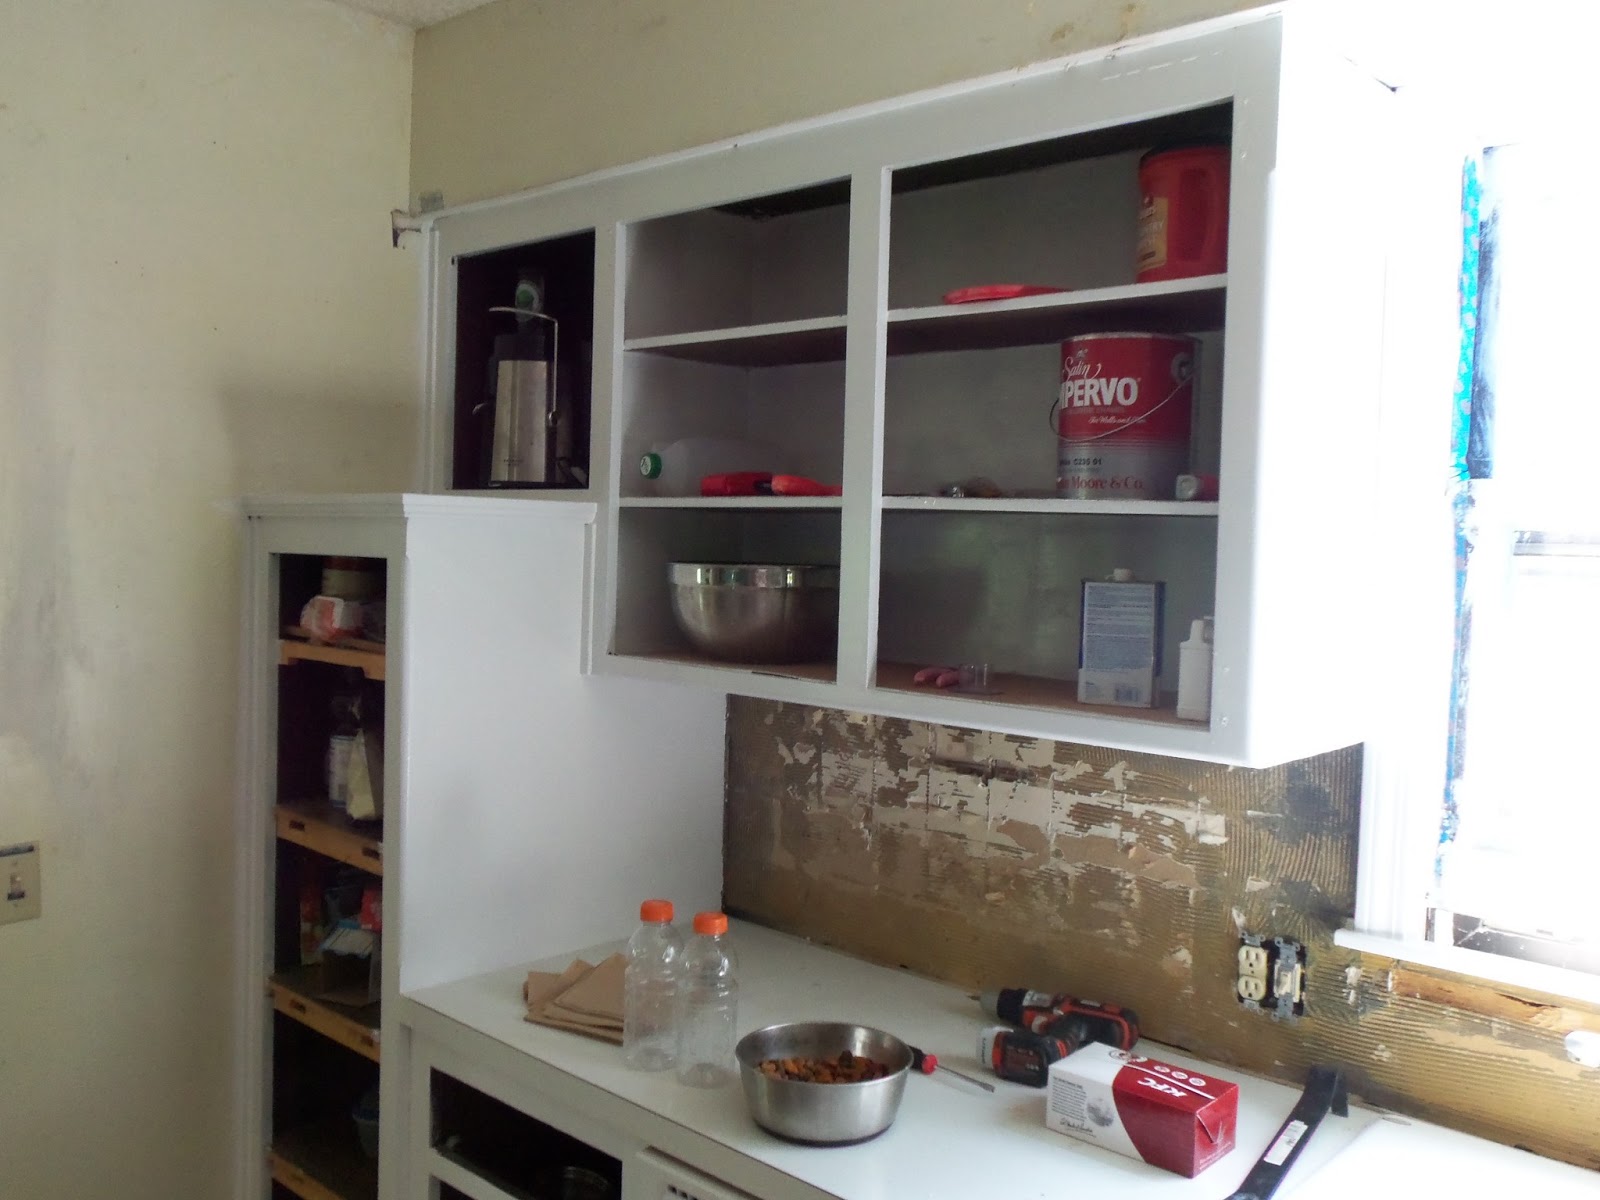
After we got two coats of primer and one coat of the BM Satin Impervo paint on the kitchen cabinet frames, we noticed a lot of cosmetic problems that weren't noticeable before so we went ahead and repaired and patched what we could to make the space a little more seamless. Big thank you to Lori Howarter for guiding us and giving us tips to make this project a bit easier. We completely trust her since she did a fabulous job with Sara's parent's remodel and she has been kind enough to offer advice and help us pick out some important pieces to our renovation.

Since we were tearing up the kitchen we also decided to remove all of the old ceramic tile back splash. Here are some of the kitchen updates:

My cute husband making a mess...I mean taking down the tile :)

Check out the gap in the right corner...we didn't notice it until we painted it white. The cabinets are level...the ceiling, not so much

Another shot of the cabinets

We added a trim piece to the top, but it still needs painting some caulk to seal the edges

The trim still needs paint, but it sealed up quite nicely
With all of the trim and cabinets painted white, our house is already looking so much lighter and our room looks so much bigger. We are working on the cabinet doors and drawers, but decided to take a break from those this weekend to tackle the drywall. Sara's parents came back from Maui on Saturday and we unfortunately managed to put my dad to work right away when he decided to ride along with us to Home Depot to pick up some drywall. We did have some drywall pieces left over from when we had to redo the sun room ceiling so we patched what we could before we bought more. The biggest problem we faced with the main room was the difference between the depths of the drywall. Since the previous owners decided to put drywall on top of the wood paneling, we had to buy two different types of drywall and have to try to smooth out the seams and angles with the mud. The most challenging area was the ceiling between the fireplace and the skylight, but we finally got all of the drywall hung. Check out what a difference the drywall has already made:

Main room with the drywall up

Most challenging area...but worth it. There's so much more light now!

The bar area with drywall

A look into the kitchen

Sara cut out the electrical box on the first try...boom!
Our next phase will be finishing the drywall, painting the ceilings and finishing the drawers and cabinets. We have a couple details that we are keeping as a surprise until the end, so stay tuned for more updates. We can't wait to get our kitchen back in working condition, but for now we will take some aspirin and try to relax for the rest of our long weekend.

XOXO,

Sara, Brian & Tequila